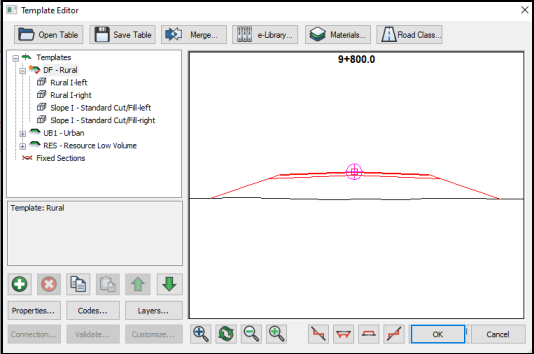
Template Editor dialog
This dialog is accessible from the Templates button on either the Home or Corridor ribbons. It is also available in the context menu when you right click in the Section window.
Templates are used to define the finished design surfaces including sub-grade, road surface layers, ditches, slopes, curbs, guard rails, medians etc. Using built-in logic, templates interact with topography to yield the completed cross section. It is important to understand that a template is not just a cross section drawing. Templates will yield different results depending on the ground conditions where the template is applied.
The Template Editor dialog allows you to change various template parameters. The effect of changing these parameters can be evaluated graphically in the editor. One of 4 "standard" ground profiles (full cut full fill, right/left slope cuts may be selected using the buttons along the right hand side of the dialog box, to view the effect of your modifications in these standard cases. The "Stn" button will retrieve the ground profile for a selected station.
Error Messages
The following error messages may appear:
-
BRIDGE - indicates a template which has no cutting filling e.g. no volumes
-
STRIPPING ERROR - indicates a stripping error has occured. This could happen if the cut/fill slope angles for ground layer 1 are too shallow.
-
WARNING - OVERLAPPING OR DIVIDED SG SURFACE - indicates the subgrade surface is split or overlapping. This situation is possible in a road widening project.
-
WARNING - INVALID OR DISJOINT TARGET/VOLUME SURFACE - indicates that a template surface is invalid.
-
OUT OF RANGE - indicates that a template corridor surface is out of range.
-
REFERENCE FEATURES MISSING - indicates that the template is referring to reference invalid or missing reference features).
-
CIRCULAR DEPENDENCIES - indicates that horizontal alignments have invalid dependencies. This could happen if a target reference surface or alignment is processed after the current alignment (see also).
-
DEPENDENCY PROBLEMS - indicates that horizontal alignments have invalid dependencies. This could happen if a target reference surface or alignment is processed after the current alignment (see also).
The following items are contained in the template editor:
Template Editor Tree Control
Templates are built on a hierarchy of sub-objects. The Template Objects Tree control allows you to view and select Templates and their sub-objects.
The top level of the tree contains the Templates  (and Component Folders
  ). If you double click on a Template (or Component folder) the Components
  it contains (Roadway, Ditches, Slopes, and Custom) will appear.
The buttons below the Tree Control (Add, Delete etc.) apply to the item selected in the tree control.
Properties (right click or button)
Opens the appropriate properties dialog box for the selected item in the Tree Control.
Template Component properties:
Add (right click or button)
This creates a new item of the type selected in the tree control, and then opens the appropriate properties dialog box.
Note that the new item will be a copy of the item selected before Add (if possible).
Copy/Paste (right click).
Items (Templates, Components, Fragments and Legs) may be copied to the clipboard and then pasted into a new location. Copy and then Paste as New is almost the same as using the Add button.
Delete
Will delete the selected item in the Tree Control.
Shift Up/Down
Will shift up/down the selected item in the Tree Control. A template is calculated by working from the top down in the Tree Control and building from the centerline out; the order of items is very important.
Customize
Customize is only available if the Extended Templates function group is enabled (see Function Groups).
Merge
Select this button to merge another template table (TPL) with this one.
e-Library
This option connects to the internet and allowing you to download template component objects from the on-line library. In order for this option to work you must be connected to the internet.
View Controls
1. Zoom Extents
2. Refresh Screen
3. Zoom Out
4. Zoom In
5. Typical - Down to Right
6. Typical - Cut Section
7. Typical - Fill Section
8. Typical - Down to Left
9. Multiple Windows
10. Station Options
11. Previous Station
12. Next Station
Options
Activates the Template Display Format dialog. It controls the line type, color and hatch of template surfaces in the section display windows. It also allows you to format the template leg and point code labels.
Materials
Codes
Activates the Template Codes dialog box. Template Codes dialog allows you to set-up template codes for display in the graphic and text windows.
Validate
Save Table
Saves the templates, road class specifications, codes and materials for in a file (*.tpl) for future use. This step is strictly not required unless you want to make the template information available for other designs (template information is always stored with the current design).
Open Table
Retrieves the templates, road class specifications, codes and materials from a file (*.tpl).