Section Window Options dialog
When the Section window is current, this dialog is accessible from the Section ribbon, Section Options button. You can also right click in the Section window and use the context menu.
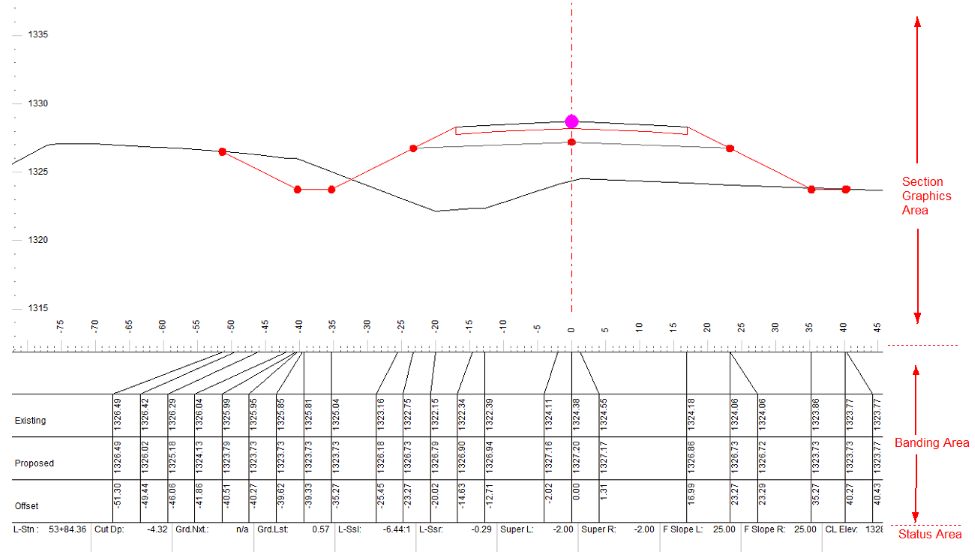
The Section Window consists of a main graphics are (Section Graphics) and Sub-Windows (Banding, and Status):
Scales
The following options control the horizontal and vertical scale of the Section Graphics area.
Horizontal Scale
Vertical Scale
Automatic Scaling (check box)
If selected, the scale is set so that both slope stakes are visible in the window. If automatic scaling is not used you can set the Scale explicitly.
Fixed ratio (check box)
This check box allows you to control the ratio between horizontal and vertical scales. This option only applies if Auto Scale is enabled. If selected, the Vertical and Horizontal Scale edit boxes (see above) contain the ratio of horizontal to vertical scale.
Options
The following options apply to the Section Graphics area.
Grid Check Box (check box and options button)
This check box allows you to enable the display of grid lines. Clicking on the "+" button will popup the Grid Options dialog allowing control over the format and display of the grid lines.
Template Box (check box and options button)
If selected the road template (road surface slope stake to slope stake) is displayed. The "+" button beside the check box allows you to change the color, hatch and linetype for template surfaces; you can also show or hide labels associated with template legs (see the Template Display Format dialog).
Topography (check box and options button)
Culverts (check box and options button)
Labels (check box and options button)
Various labels can be displayed along the section. Checking Labels will enable the display of labels on the section. Pressing the "+" button beside the Labels button will popup the Template Display Format dialog. This dialog allows you to control the display of text labels in this section window. The font size and position of these labels can also be controlled.
Display Section (check box)
If selected the cross section will be drawn, otherwise only the status information will be displayed.
P-line (check box and options button)
If selected, a vertical line representing the P-line will be drawn. This option will be disabled if the design does not have a P-line.
L-line (check box and options button)
If selected, a vertical line representing the L-line will be drawn. NOTE: It is possible to display the template attachment point by clicking on the "+" button and assigning a symbol.
Ground Layer 1 (check box and options button)
If selected Layer 1 is displayed. The "+" button beside the check box allows you to change the color, line style and symbol. See Stratum Layers in the Survey/Map Online help for more information.
Ground Layer 2 (check box and options button)
If selected Layer 1 is displayed. The "+" button beside the check box allows you to change the color, line style and symbol. See Stratum Layers in the Survey/Map Online help for more information.
Stripping (check box and options button)
If selected the stripped surface is displayed. The "+" button beside the check box allows you to change the color, line style and symbol. See Clearing and Stripping for more information.
Fixed Window (check box)
If selected, the title bar and border will be removed and the section windows position will be fixed. This style will optimize screen space.
Vert Alignment (check box)
Horz Alignment (check box)
Scroll Bars (check box)
If selected, scroll bars will be placed on the right hand side and along the bottom of the Profile Window allowing the view to be shifted using the mouse.
Ref. Features
Ref. Terrains
This check box allows you to enable the display of terrain reference surfaces. Clicking on the "+" button will popup the Reference Surfaces dialog, allowing you to choose the surfaces for display and format selection.
Snap (check box)
NOTE: The color linetype for the vertical P-line and L-line is taken from the plan window if one exists.
Display Header (check box and options button)
If set, text is displayed at the top of the Section window graphic. Clicking on the "+" button will popup the Section Header Text Options dialog allowing you to change the format of the station header information.
Templete Codes (button)
This button allows you to add or remove template point codes. To report point code information the point codes must first be added (via this option) and a 'Recalculation of the road alignment' done. Once this has been done the point co,des will appear in the reporting fields.
Sub Windows
Banding (check box, "+" button)
If selected, the Banding Sub-window is displayed under the section graphic. Press the "+" button to open Banding Sub-Window Options.
Status (check box, "+" button)
If selected, Status text information is displayed under the section graphic. Use the "+" button to open Status Area Options. Some items in the status window "track" when a point is being edited.
Fonts (button)
This button to change the text font.