Profile Window
The Profile Window provides facilities for displaying and modifying the road vertical alignment. This window will display the ground profile (along the L-line or P-line) and allows you to interactively design a gradeline.
Creating and Configuring the Profile Window
1) To create a new profile window, select function View | New Window | Profile. Only 1 Profile Window can be created.
2) To configure the Profile Window, activate it by clicking on its title bar. Select function Profile | Profile Options. To save these options for future use see Layout Files.
Features Displayed
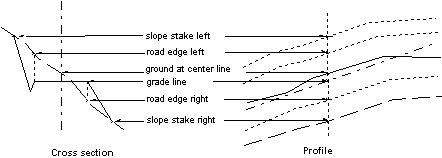
Some features that can be displayed in the Profile window are shown in the figure below.
Figure 1. Features commonly displayed in the Profile window.
Road edge projections and slope stakes are calculated features. Their positions are calculated at each plan, profile and reporting point; by intersecting a road template with topography. The ground at center line (ground line) must be calculated if there is horizontal alignment (it is then different from the P-line traverse).
All calculated features are displayed as straight lines between cross sections. To generate an accurate representation of these features, insert reporting points to cause more cross sections to be calculated (see Corridor | Operations | Auto Generate). When a new design is created reporting points are inserted at each survey station. If these points are later deleted, it is recommended you re-insert reporting points on surveyed stations using menu Corridor | Operations | Auto Generate.
Sub-windows
It is possible to display information below the profile window in Sub-windows.
You can include/exclude items to be displayed in the sub-windows. If any items have been selected for inclusion in the Profile Sub-windows, an area will be allocated at the bottom of the Profile Window. A narrow size bar will separate the main Profile Window from the sub-windows. This size bar can be dragged using the mouse to control the vertical size occupied by the sub-windows.
To add an item to the sub-window area:
1. Click on the Select button. This will pop up the Item Selection dialog.
2. From the Available List box on the left, select the item you wish to add by clicking on it.
3. Press the Add button and the item will appear on the right.
4. Press the OK button to return to the Profile Options dialog.
To remove an item from the sub-window area:
1. Click on the Select button. This will pop up the Item Selection dialog.
2. From the Selected List box on the right, select the item you wish to remove by clicking on it.
3. Press the Delete button and the item will be removed.
4. Press the OK button to return to the Profile Options dialog.
To change the options for a sub-window item:
1. Select the item from the Sub-window List box.
2. If the item has options available the Options button will be enabled.
3. Press the Options button and set required parameters.